How to make a simple hello app for the e-Reader
Today, let's make a very simple e-Reader app in z80 assembly. This tutorial won't be very elaborate. There's almost no code at all, instead the focus is on getting the tooling setup and covering some background on how e-Reader apps work.
Install pyz80
This tutorial is about writing e-Reader games in z80 assembly, so we need an assembler.
I actually use asz80 to assemble my games, but for this tutorial I chose pyz80 since it's (pretty) easy to install. You will need a python environment, and that varies a lot from OS to OS, so I will leave that up to you.
Once you have a working python environment, installing pyz80 should be as easy as
python -m pip install pyz80 Now run pyz80 and if you see its help text, you should be good to go.
pyz80No input file specified pyz80 by Andrew Collier Enhancements by Simon Owen, Adrian Brown, Stefan Drissen https://github.com/simonowen/pyz80/ Usage: pyz80 (options) inputfile (s)Options:-o outputfile save the resulting disk image at the given path --nozip do not compress the resulting disk image -B filepath Bootable (usually DOS ) added first to disk image, but only if the first assembled file has no BOOT signature. -I filepath Add this file to the disk image before assembling May be used multiple times to add multiple files --obj=outputfile save the output code as a raw binary file at the given path -D symbol -D Define a symbol before parsing the source (value is integer ; omitted, assume 1)--exportfile=filename Save all symbol information into the given file--importfile=filename Define symbols before assembly, from a file previously exported --mapfile=filename Save address-to-symbol map into the given file--lstfile=filename Produce assembly listing into given file--case treat source labels as case sensitive (as COMET itself did )--nobodmas treat arithmetic operators without precedence (as COMET itself did )--intdiv force all division to give an integer result (as COMET itself did )-s regexp print the value of any symbols matching the given regular expression This may be used multiple times to output more than one subset -x display values from the -s option and PRINT directives in hex -e use python's own error handling instead of trying to catch parse errors Make a test binary
Make a file called hello.asm and put this in it.
ld a, 4and now assemble it
pyz80 --obj =hello.bin hello.asm pyz80 has some niceties built into it related to 8 bit computers (which commonly used the z80 as their processor). We don't want any of that. --obj=hello.bin is how we avoid all of those things. This parameter tells pyz80 to just assemble the file and dump the resulting raw bin into hello.bin.
hello.bin should be tiny, just 2 bytes
ls -l total matt matt 17 Oct 19 hello.asm -rw-rw-r-- matt matt 2 Oct 19 hello.bin And if you look at it in a hex editor, you should see
00000000 3E 04 If you get anything else, then pyz80 is not working correctly for you.
Get the e-Reader dev tools
You will need the e-Reader dev tools. You can grab them for Windows at CaitSith2's website here, grab the "Dotcode Dev Package". For other OSes, you can build the tools via this repo. If you are on Linux, you can find compiled binaries in this tutorial's companion repo here.
The non-Windows version of nedcmake often crashes. One day I'll get around to fixing this, but for now I use the Windows version of nedcmake through wine.
Writing an actual e-Reader app
Take hello.asm and expand it to this.
    include "erapi.asm"    org 0x100
    ; ERAPI_SetBackgroundMode()    ; a = mode (0-2)    ld a, 0    rst 0    db ERAPI_SetBackgroundMode
    ; ERAPI_LoadSystemBackground()    ; a = index (1-101)    ; e = bg# (0-3)    ld  a, 4    ld  e, 3    rst 0    db ERAPI_LoadSystemBackground
    ; ERAPI_FadeIn()    ; a = number of frames    ld a, 0    rst 0    db ERAPI_FadeIn
    ld h, 0    ld l, 12    ld d, 2    ld e, 2    ld b, 10    ld c, 4    rst 0    db ERAPI_CreateRegion    ld (@region_handle), a
    ld a, (@region_handle)    ld bc, @hello_text    ld de, 0    rst 0    db ERAPI_DrawText
@loop:    ld a, 1    halt
    jr @loop
@region_handle:    db 0
@hello_text:    defm "hello ereader"    db 0
hello.asm is now including erapi.asm, so create that file in the same directory. For now, it just needs to be this.
; RST 0 ERAPI_FadeIn: equ 0x00ERAPI_LoadSystemBackground: equ 0x10ERAPI_SetBackgroundMode: equ 0x19ERAPI_CreateRegion: equ 0x90ERAPI_DrawText: equ 0x99hello.asm is now a real e-Reader app. We'll go over the code shortly. But for now, let's just get it running.
Assemble it
First assemble it with pyz80.
pyz80 hello.asm Compress the binary with nevpk
Invoke nevpk to compress the binary you just made.
nevpk -c -i hello.bin -o hello.vpk A "vpk" is a compressed file using the vpk0 compression algorithm. It was named that because vpk files (usually) start with the magic string "vpk0". It was developed by Hudson soft and used in their N64 games. Nintendo adopted it for the e-Reader. Most (but not all) e-Reader cards contain vpk0 compressed data. After you scan a card in, the e-Reader will decompress the data automatically.
Turn the vpk into a sav file
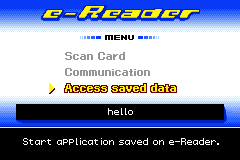
After you have scanned a game into the e-Reader, you are asked if you'd like to save it. If you do, the e-Reader will save the game's data into its sav file. The next time you run the e-Reader, you can choose "Access Save Data" to run the game you have saved, so you don't need to scan it in again.
We can take advantage of this feature of the e-Reader by turning our vpk into an e-Reader sav file, that is what neflmake does.
neflmake -i hello.vpk -o hello.sav -type 1 -name hello If that succeeded, you will now have hello.sav.
If you load up the e-Reader ROM in a GBA emulator with hello.sav as its save file. You will be able to choose "Access Save Data" and see your app.

I use mGBA and highly recommend it. It is an excellent emulator. Getting it installed depends on your OS, so I will leave that to you. You will also need the e-Reader ROM. You can get that by dumping your e-Reader using a GBA cart dumper, or, uh, via other methods...
If you have mgba installed and on your path, you should be able to invoke it from the command line.
mgba ereaderUSA.gba Turn the vpk into a raw
E-Reader cards have the game data in the dot strips, usually two per card.

For example here is my solitaire card. It has two data strips, at the top and bottom.
A raw file is the binary data from the data strips. This data contains the vpk, but in an encoded format. The encoding allows the e-Reader's camera to ingest the dots, and convert them into binary data in the GBA's RAM. The encoding helps guide the e-Reader's camera, and also contains duplicate copies of the data in the card just in case the camera fails to read part of the card. If you have ever used a parity file to repair a damaged binary, it's pretty much the same idea. The data strips work very similarly to QR Codes, you can think of a data strip as a long, narrow, QR code.
One data strip can hold about 2kb of data. A version 33 QR Code, which is 149x149 dots, can also hold about 2kb.
Hoo that's a big boy! It's pretty impressive just how much data these little e-Reader data strips can hold.
Anyway, use nedcmake to create the raw file.
nedcmake -i hello.vpk -o hello.raw -type 1 -region 1 -name hello -raw Scanning the raw in with mGBA
nedcmake will create hello.raw-01.raw. You can run this raw file in mGBA, and it's just like scanning a card into a real e-Reader.
Launch mGBA and run the e-reader ROM. Then go to File > Scan e-Reader dotcodes...
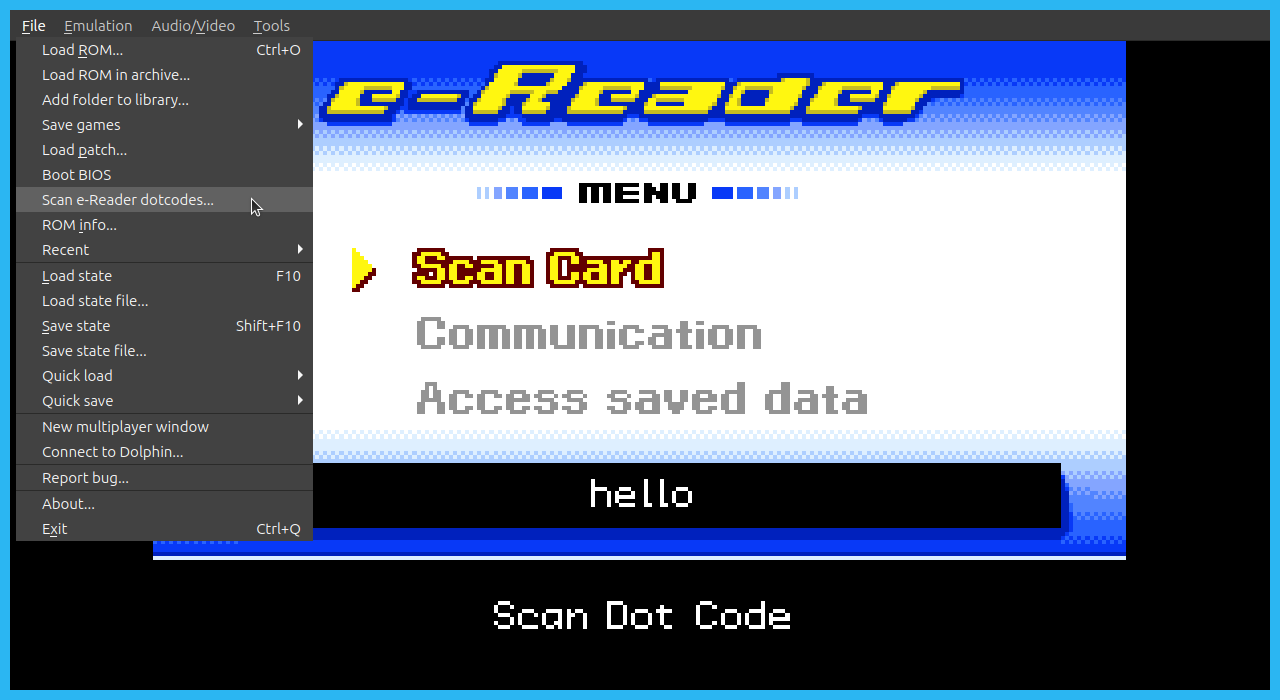
Then choose hello.raw-01.raw in the file dialog that pops up. Now in the e-Reader, choose "Scan Card" and wait. mGBA will scan in the hello card, and after a bit the e-Reader will launch it.
You can also do this on the command line
mgba ereaderUSA.gba --ecard hello.raw-01.raw Printing the card out and scanning into a real e-Reader
With the raw in hand, you can make a dotstrip image from it using raw2bmp.
raw2bmp -i hello.raw-01.raw -o hello It will spit out hello.bmp.

By default this image is 300 dpi, you can increase the dpi by adding -dpi 600|1200|2400 to the raw2bmp call.
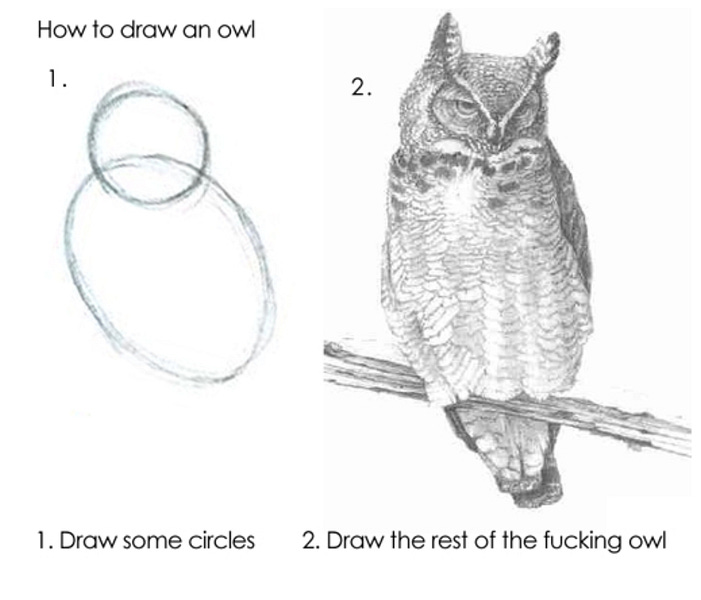
Now you can print this out, and scan it into a real e-Reader. This does work, but ... "print it out" is very much "draw the rest of the owl".
Getting a print out that will actually scan can be very difficult. I've written many blog posts on all my adventures doing this. If your print out won't scan, don't fret too much, that is the most common outcome.
A little e-Reader background
Before we jump into the code, let's get some background on the e-Reader.
The e-Reader's z80 emulator
The GBA does not have a z80 processor in it. The Game Boy processor (used to run OG Game Boy and Game Boy Color games) is similar to a z80, but the e-Reader does not use it (indeed, it can't. That processor is completely shut off from GBA games). So to run z80 apps, the e-Reader contains a z80 emulator.
Why bother with an emulator? Why not just make a native GBA app, stick that on a card, and run that? The e-Reader also supports doing this. But z80 apps have a huge advantage in that they tend to be much smaller than an equivalent GBA app. This space savings means games can fit onto fewer data strips. All official standalone e-Reader cards published by Nintendo are z80 apps, most likely due to this space savings.
The space savings is the advantage, but, well, everything else is a disadvantage. The z80 emulator has a lot of limitations.
- It is quite slow
- It can only allocate 56 sprites
- It does not support all registers or opcodes of the z80
Not to mention, you have to write your game in z80 assembly. This is a mixed bag. Most of the time it's not a big deal. But doing complex stuff can be extremely frustrating.
ERAPI
The e-Reader has a pretty extensive API built into it. This API is a collection of functions for doing things like displaying sprites, collision detection and even multiplying and dividing. This API is called "ERAPI", for "e-Reader API". This is not its official name, we don't know what Nintendo called it. This is the name enthusiasts who reverse engineered the e-Reader came up with.
Looking at hello's code
We are now ready to finally walk through the code.
org 0x100The first line is org 0x100. Let's skip this one for now and come back to it later.
; ERAPI_SetBackgroundMode() ; a = mode (0-2) ld a, 0 rst 0 db ERAPI_SetBackgroundMode Here is our first call to ERAPI. SetBackgroundMode tells the GBA which background mode we want to use.
ld a, 0 is "load the a register with zero". ERAPI functions usually take parameters, and the z80's registers are the main way to setup those parameters. Here we are telling SetBackgroundMode to set it to mode zero, which is four standard, 2d backgrounds.
rst 0 is a strange way to call a function on the z80 cpu. Normally functions are called using the call opcode. When the z80 encounters call, it will jump to the address of the function, and start executing it, until it encounters the ret opcode, which causes the cpu to return to where it came from. rst 0 does the same thing, but unlike call it can only jump to one location. The advantage is call takes up 3 bytes, while rst 0 only requires 1. So for functions you will call very often, that space savings can really add up on old computers that didn't have much storage.
The e-Reader uses rst 0 to call ERAPI functions. Since it's just a z80 emulator and not a real cpu, the e-Reader is able to fudge things a bit. Whenever it encounters rst 0, it will look at the next byte to see which ERAPI function is being called. Then when the ERAPI function is done, it will move beyond that extra byte and keep executing the z80 app.
In this case, db ERAPI_SetBackgroundMode is telling ERAPI which function we want to invoke. db just has the assembler drop a byte into the binary, and if you look at erapi.asm, you will see that ERAPI_SetBackgroundMode is just the constant 0x19.
This is how all ERAPI functions are called: set up the register parameters, call rst 0, and finally drop in a single byte that indicates which function we want to invoke. When writing an e-Reader z80 app, you will do this all the time.
Let's keep going...
; ERAPI_LoadSystemBackground() ; a = index (1-101) ; e = bg# (0-3) ld a, 4 ld e, 3 rst 0 db ERAPI_LoadSystemBackground Another ERAPI call. This time we are loading a background that is built into the e-Reader. We are loading the a register with 4, and the e register with 3. 4 is the ID of the desert scene background we want. 3 is telling the e-Reader to load this into the last GBA background. Remember how we set mode zero for SetBackgroundMode? That gave us four backgrounds to work with, numbered 0 through 3.
In mGBA, go to Tools > Game state views > View map...
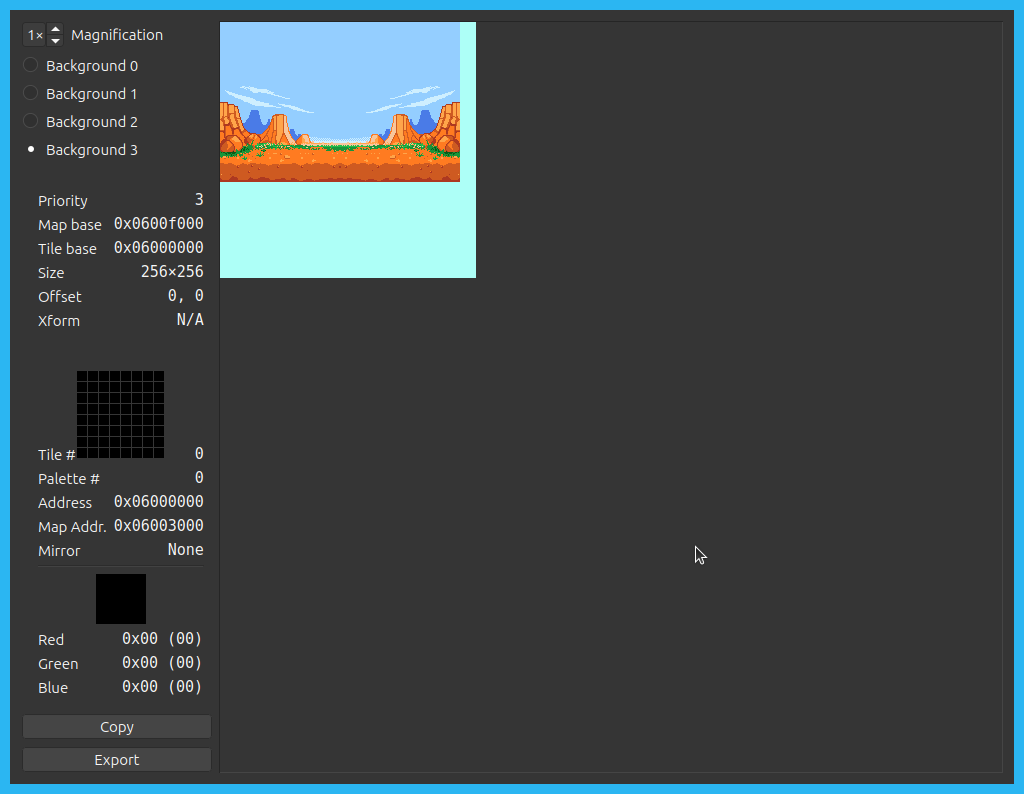
Here you can see the four backgrounds and what are loaded into them. If you choose background 3, you will see the desert scene is loaded there.
When choosing a system background to load, this background dump is helpful.
; ERAPI_FadeIn() ; a = number of frames ld a, 0 rst 0 db ERAPI_FadeIn And next up is another ERAPI call. This tells the e-Reader to display the screen. Without this call, you would just see a black screen. This function takes a duration parameter in register a. We set it to zero so the screen shows up immediately. If you change it to say 100, you will see the screen fade in over time, useful for transitions.
ld h, 0 ld l, 12 ld d, 2 ld e, 2 ld b, 10 ld c, 4 rst 0 db ERAPI_CreateRegion And yet another ERAPI call. This one is a bit more complex, it takes 6 parameters! This is creating a draw region on the screen. Whenever an e-Reader app wants to display text, or draw things like rectangles and lines, this needs to happen inside a draw region. Most of the parameters are telling the e-Reader where on the screen we want the region:
- d: the x of the region, in tiles
- e: the y of the region, in tiles
- b: the width of the region, in tiles
- c: the height of the region, in tiles
These values are all in tiles. Tiles on the GBA are 8x8 in size, so we are telling the e-Reader to put our region here:
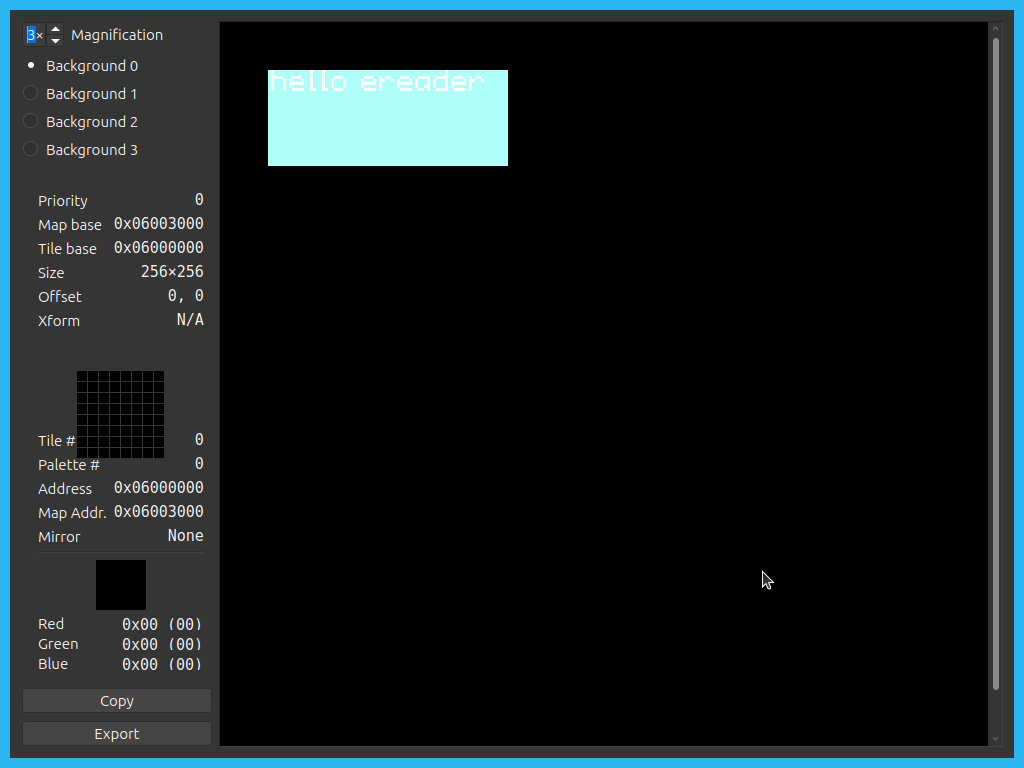
Draw regions exist on one of the 4 backgrounds. The h parameter is telling the e-Reader to place this region on background zero. The l parameter is telling the e-Reader this region will use the 13th background palette. This is the desert background's palette. If we didn't use the same palette, the text would be black as we have no other palettes available to us.
If you launch the game in mGBA and go to Tools > Game state views > View map..., then head to background 0, you can see the text drawn into it.
Right after this ERAPI call is this line.
ld (@region_handle), a ERAPI functions can have return values. CreateRegion returns the region's handle in the a register. A region handle is just a number. Whenever we want to do something with this region, we need to pass this handle back to ERAPI so it knows which region we are working with.
This line is "take the contents of the a register, and save them into memory at the @region_handle location". If you look lower in the file we have
@region_handle: db 0@region_handle: is a label. It's a way to name a part of your assembly program, then use that name in other parts of the program. The db 0 is just telling the assembler to drop a byte with the value zero here. We are just leaving a byte of space to have room to store the region handle into.
The parentheses around @region_handle in the ld call mean we are dereferencing the region_handle pointer. If you don't know what that means, don't worry too much about it, it's not important for now.
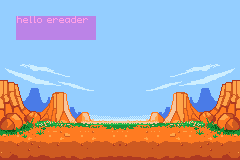
ld a, (@region_handle) ld bc, @hello_text ld de, 0 rst 0 db ERAPI_DrawText Our final ERAPI call in the program. Here we are telling the e-Reader to draw the text "hello ereader" into our draw region.
The first line is doing the opposite of the last line in the previous section. Here we are saying "take whatever value is stored at @region_handle, and stick it into the a register". The draw region's handle is the a parameter for DrawText.
ld bc, @hello_text is loading the pointer to our string into the bc register.
@loop:    ld a, 1    halt
    jr @loop
We have finished putting all of the stuff on the screen, and now we are "running" the game. Since this "game" doesn't do anything, this is just an infinite loop.
Here we are loading a with 1, calling the halt opcode, then jr is "jump relative", it's sending the cpu back to @loop, where it will load a and halt again, over and over and over again, until we finally turn the GBA off.
halt is an opcode on the z80 that is normally used for the cpu to synchronize with external devices, such as a disk drive or something like that. The e-Reader's z80 emulator has co-opted halt to mean "draw a frame to the screen".
Calling things like DrawText won't actually show up on the screen until halt is called. You can also set a to a higher value, say 60, then call halt, and the e-Reader will pause for 60 frames (1 second). This is useful in "real" e-Reader apps.
@region_handle:    db 0
@hello_text:    defm "hello ereader"    db 0
And finally, this is our data for the app. We've already covered @region_handle. @hello_text is an ascii text string. defm tells pyz80 to take this string and place the ascii values for it into the binary. DrawText needs a closing zero terminator to know when the string ends, that is what db 0 is doing.
Oh, org?
We skipped org 0x100. What does that do?
The labels in our program, @region_handle and @hello_text, are really just for us. They make it easier to write assembly programs and refer to different parts of the program. Once the binary is assembled, those labels will be replaced with numbers. The number is the address of the label, and the address is just the position of the label in the file.
Let's pretend pyz80 was assembling our program, and had stuck 149 bytes into the binary when it encounted @region_handle. That means @region_handle's address will be 150, as it will be the 150th byte in the program. So in that case, the line ld (@region_handle), a will basically become ld (150), a.
Ok that all makes sense, but there's a catch. In our example, @region_handle will be at address 150 in the binary, but it won't necessarily be at address 150 when the app is loaded into the GBA's memory. Its actual address in memory will depend on where in memory the e-Reader stuck our app.
When the e-Reader loads a z80 app into the GBA's memory, it starts at memory address 0x100. So in our binary, the first byte is at address 0, but when running, it will actually be at address 0x100.
org 0x100 is telling the assembler that when the app runs, all of the addresses will be off by 0x100. So above when it decided the address for @region_handle was 150, it will add 0x100 onto that address and actually write down the address 356 (which is 100 plus 0x100, which is 256 in decimal). Now when our app does ld (356), a, the draw region handle will go into the correct place in memory.
Conclusion
Wow, that was a ton of work just to show "hello ereader" on a GBA screen. e-Reader dev is both very simple in some ways, and very complex in others.
This tutorial will not teach you z80 assembly, as there are many resources out there for that.
Here is the companion git repo for this tutorial.
In future installments we will get into sprites, input, loading graphics, sounds, and more. Stay tuned!